If you’re looking for a beginner’s guide to setting up Google Analytics, then you’ve come to the right place. In this blog, we will show you the basic setup you will need to run a successful Google Analytics account. Please note that this is only for a basic setup, as you will need additional support to start making business decisions based on your Google Analytics data.
Google Analytics setup
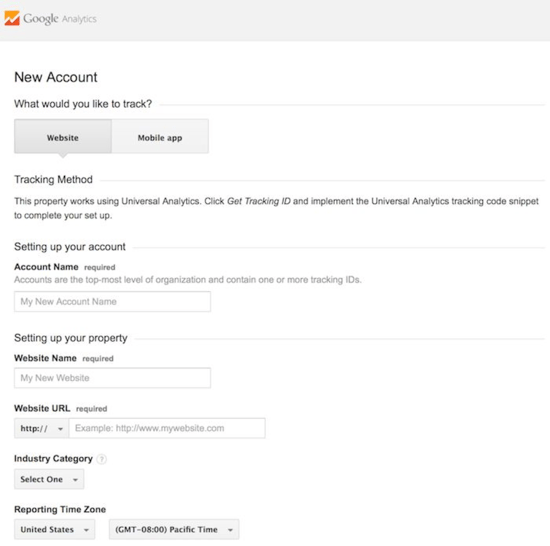
Create a Google Analytics account
- Create a gmail account or use an existing gmail account to obtain master access to the account. There are different levels of access in GA -- you only want one email address with all of the permissions in order to maintain data integrity and security. You can add Property or View level permissions along the way as you see fit.
- When you sign up, you will be prompted to select if you want to track a Website or a Mobile App. Make the appropriate selections and begin the setup. We recommend selecting all of the data sharing options GA gives you.
 Create a Google Tag Manager account
- We recommend setting up GA through Google Tag Manager instead of using the GA code. Go to Google Tag Manager to create a Google Tag Manager account as you did with GA. Use the same gmail address and company name.
- In GTM you will create a Google Analytics Settings variable to call to your Google Analytics account:
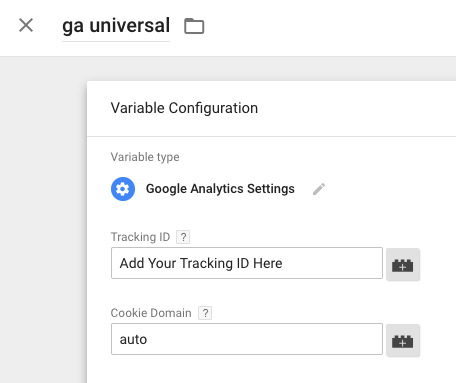
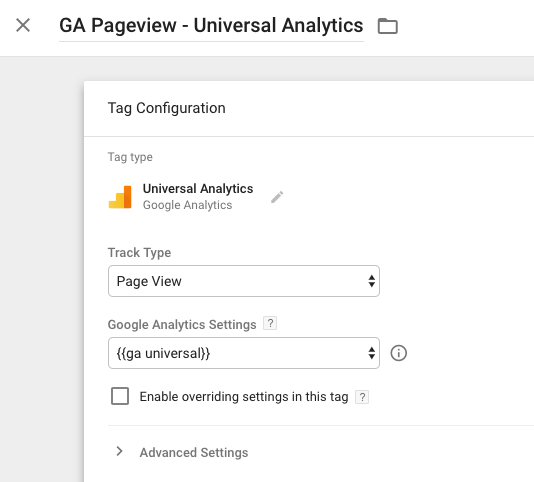
- Next, you’ll want to create a Tag by choosing the Google Analytics template. Use the variable you just created for your tracking ID. Select your track type -- we suggest “Page View” so it tracks each time a browser loads a site page. Then select your trigger; for the basic implementation, select “All Pages” and GA will fire on every page of the website.
- Select Submit and you will publish your container.
- In GTM, click the container ID in GTM (in blue and formatted as “GTM-XXXXXX), copy and paste the code snippets on your website as instructed.
- There are many ways to debug and verify that you installed it correctly; we recommend using the Chrome Add-On “Tag Assistant”. Once installed, you can enable it while on your website to confirm that GA and GTM are installed properly. If there are any red or yellow issues with your account, you must address these immediately, as the data will be inaccurate. Assuming there is a clean implementation, we can move on to the admin portion of Google Analytics.
Google Analytics Admin section
- In the GA Admin Section, go to the View Settings and change the view name to your business or client name. Scroll to the top of the view and copy it. You will copy and rename to have a final of 2 additional views: Raw Data Do Not Touch and Testing.
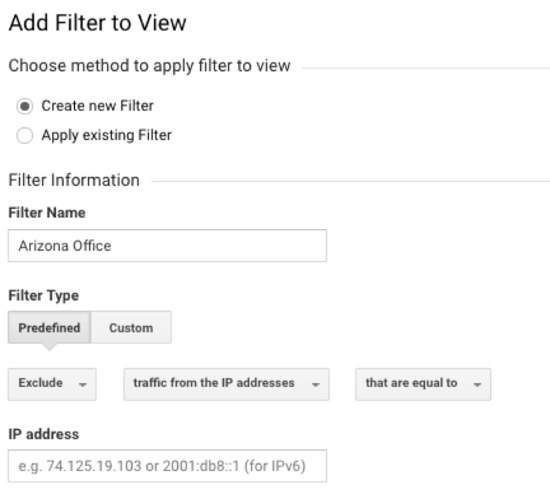
- Scroll over to the Filter section of the view to add in a filter IP Addresses. You will need to do this for your own offices, third-party vendors, and client offices (if applicable)
- Filter Name will be which office/IP address you will be excluding
- Filter Type will be Predefined unless you are adding multiple addresses to a single filter
- Filter Type - Exclude
- Select source or destination - traffic from the IP addresses
- Select expression - that are equal to
- Input the IP address using the format examples
- To make the data more consistent, we want to push the URL, Campaign Names, Mediums, and Sources to lowercase. This will also avoid having “(other)” show up in your reports. We can use this using filters.
- Name your filter, ex: Lowercase Source Names
- Under Filter Type, select Custom
- Click on Lowercase and click on Campaign Source. You will do this for Hostname, Campaign Name, Campaign Medium and Campaign Source.

- We recommend adding filters to exclude spam from your website. You can find a running list here, but you will also need to monitor your data to check for any locations, languages, or sources that may be spam to your website.
- Once you’ve implemented the necessary filters, copy the view and label it “Data Science”. This will be used for any vendors or anyone who will only need access to this view.
Google Analytics recommendations moving forward
To ensure you are using your GA account properly and to the best of its ability, we recommend linking your Google AdWords to your GA account to see your ad and site performance in GA, import GA goals and e-commerce to your AdWords account, and to take advantage of the remarking capabilities GA offers. Additionally, you should set up goals, funnels and e-commerce tracking (if applicable) to track how your website actually helps your business. To actually make sense of your data and help your marketing teams make decisions, you will need custom reports, dashboards and segments for analysis.
This is only the start of creating a Google Analytics account; with over 150 admin selections on the backend, there is a lot you can do to customize your account to give you accurate data for your business decisions. If you only use an out-of-the-box account, you will encounter inaccurate data that will lead to poor decisions for your marketing efforts.
Want help customizing your GA account? Contact us via the form below to see how our data team can assist!